Search for answers or browse our knowledge base.
Generate Invoices
You created your matters. You entered your time, or your expenses, or both.
If it is a fixed fee or contingency matter, you recorded your fee.
You are ready to invoice your clients.
Note: For a broader understanding of the billing process, see Billing Workflow.
- If you have enabled the invoice approval process under Setup > Firm Settings > Invoice Settings, you can create and approve invoices.
- If not, you can generate individual invoices from Matters and batch invoices from Billing > Invoice.
Important: Once an invoice is generated, it is considered approved by default.
Add a Single Invoice
This process works best for:
- Firms dealing with contingency matters
- Firms dealing with flat fee matters
- Firms wanting to invoice a single client
Watch a Video
From Matters
From Matters, you can generate an invoice based on one or more time and expense cards for a single matter.
To generate an invoice:
- From the left navigation panel, click Matters.
- On the Matters screen, double-click a matter and scroll down to its summary section.
- From the tabs on the Matters Summary section, click Billing.
- From the tabs atop the Billing screen, click Invoice.
- From the toolbar atop the Invoice screen, click Add Invoice.
From Billing
To generate an invoice for a single matter from billing:
- From the left navigation panel, click Billing.
- From the Billing menu, click Invoice.
- From the toolbar atop the Invoices screen, click Add Single Invoice.
- In the Select Matter to Bill field, enter a matter number or matter name.
Add Single Invoice
On the Add Single Invoice screen, you can modify entries, as well as add timecard and soft cost expense.
Modify Entries
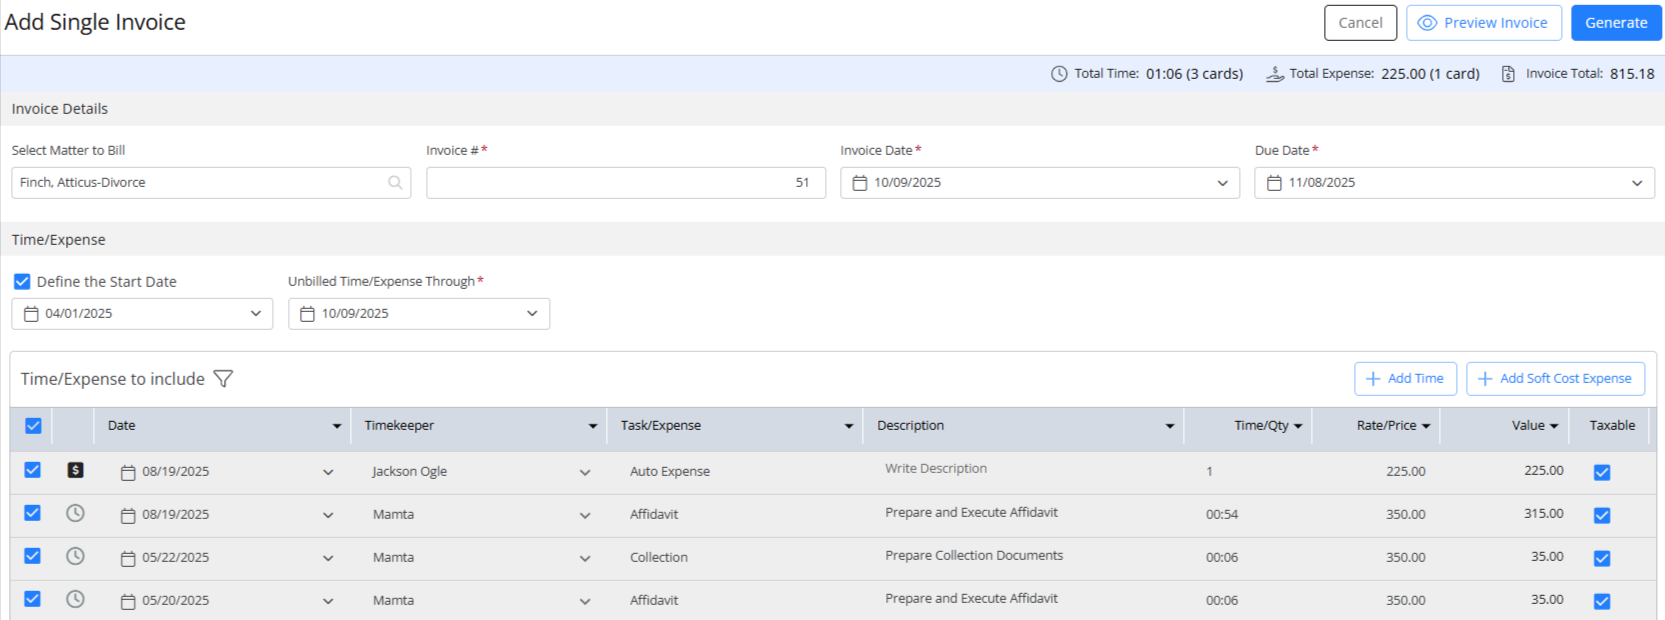
Edit Invoice Details
In the Invoice Details section of the screen, you can:
- Override the invoice number generated by the system, if desired.
Note: The application does not permit duplicate invoice numbers. - Edit the Invoice Date and Due Date fields, if needed.
- Check the box and Define the Start Date from which invoices should be visible, if needed.
- Override the Unbilled Time/Expense Through date to ensure all time/expense entries included are within the appropriate date range.
Time/Expense Grid
In the Time/Expense grid, you can:
- Edit Time Entries: Edit the date, timekeeper, task/expense name and description, time/quantity, and rate/price fields. The value field will be updated based on your entry.
- Edit Soft Cost Expense: Edit the date, timekeeper, task/expense name and description, time/quantity, and rate/price fields. The value field will be updated based on your entry.
- Edit Hard Cost Expense: Edit the timekeeper, task/expense name and description. The date, time/quantity, and rate/price fields are not editable.
- Add Time: If you have some unentered time, click Add Time atop the grid and a timecard will open with the matter name pre-filled by default. After you fill all other mandatory fields and save the timecard, if the date entered is within the date selected for the invoice, the timecard will display in the grid.
- Add Soft Cost Expense: If you need to enter an expense, click Add Soft Cost Expense atop the grid and an expense card will open with the matter name pre-filled by default.
- In the section below, you have many options from which to choose. For additional information about these fields, see Invoice Screen Field Descriptions.
- If you have enabled trust auto apply and have trust funds available for the matter, you will see a message informing you that the matter has trust funds available. Check the box if you wish to apply available trust funds.

- Click Generate. If you wish to generate your invoice(s) in draft, read the article on Pre-Bill Approval Process.
The Invoice screen refreshes, displaying your invoice in the listing. If you have attached files to the invoice, a paper clip icon displays on the far left of the row.
Once you generate your invoice, you can view it, print it, and email it directly to your client.
Batch Invoicing
From Billing, you can generate multiple invoices across multiple matters at once.
Watch a Video
- From the left navigation panel, click Billing.
- From the Billing menu, click Invoice.
- From the toolbar atop the Invoices screen, click Add Bulk Invoice.
The Add Bulk Invoice screen opens, displaying matters with unbilled time and expense entries.- Edit the Invoice Date and Due Date fields, if needed.
- Check the box and Define the Start Date from which invoices should be visible, if needed.
- Override the Unbilled Time/Expense Through date to ensure all time/expense entries included are within the appropriate date range.
- On the far right of the Select Matters To Bill section, click the filter icon.
The Filter panel displays. - In the Matter Billing Method section, select Hourly, Fixed Fee, Contingency, or all three, as applicable.
The Select Matters To Bill listing refreshes. - In the upper right corner of the Filter panel, click X to close the panel.
- In the Select Matters to Bill section, check the boxes to the left of the matters you want to bill.
- If you have enabled the trust auto apply feature at your firm and matter level, you will be able to use the available trust funds to pay the invoice(s) in the Invoice Payment Options by checking the box beside Apply available trust funds.
- To edit a time or expense card, if necessary, to the far right of its row, click the right arrow:
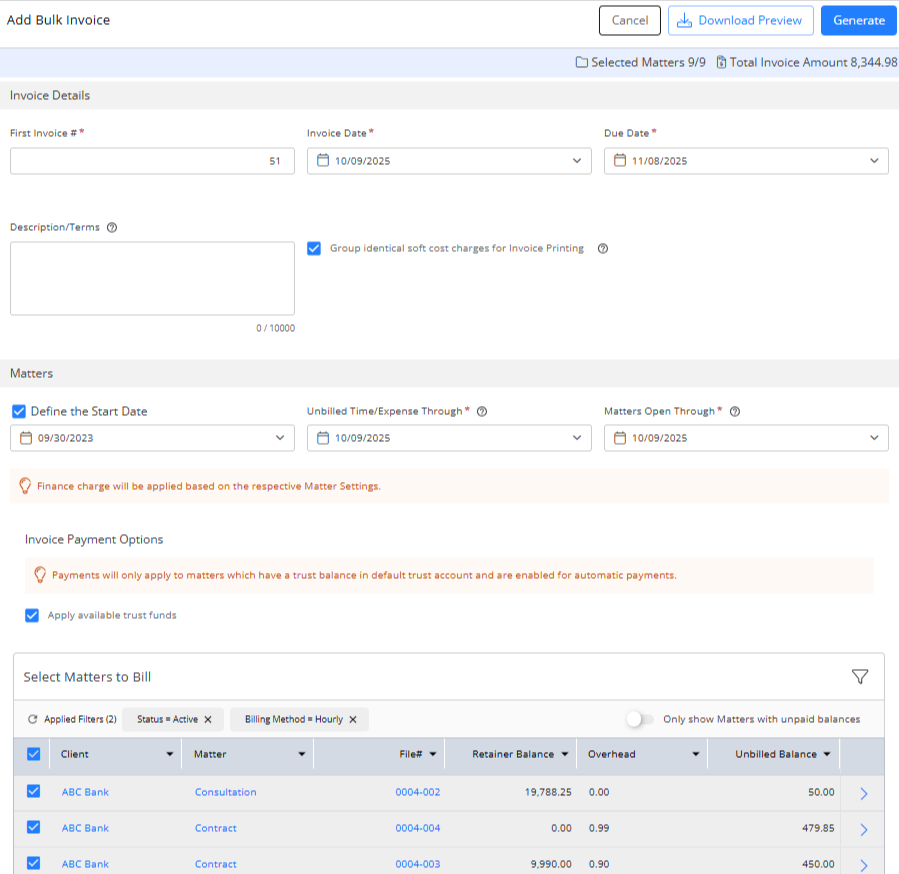
- In the Time/Expense to bill grid, you can:
- Edit Time Entries: Edit the date, timekeeper, task/expense name and description, time/quantity, and rate/price fields. The value field will be updated based on your entry.
- Edit Soft Cost Expense: Edit the date, timekeeper, task/expense name and description, time/quantity, and rate/price fields. The value field will be updated based on your entry.
- Edit Hard Cost Expense: Edit the timekeeper, task/expense name and description. The date, time/quantity, and rate/price fields are not editable.
- Add Time: If you have some unentered time, click Add Time atop the grid and a timecard will open with the matter name pre-filled by default. After you fill all other mandatory fields and save the timecard, if the date entered is within the date selected for the invoice, the timecard will display in the grid.
- Add Soft Cost Expense: If you need to enter an expense, click Add Soft Cost Expense atop the grid and an expense card will open with the matter name pre-filled by default.
- In the upper right corner, click X to close the panel.
- In the upper right corner of the Add Invoice screen, click Generate. If you wish to generate your invoice(s) in draft, read the article on Pre-Bill Approval Process.
The Invoice screen refreshes, displaying your invoice in the listing. If you have attached files to the invoice, a paper clip icon displays on the far left of the row.
Note: Once you generate your invoice, it considered approved by default. You can view, print, and email the invoice directly to your client.
Generate Invoices For Matters With No Recent Activity
If you have billed your clients but have not received payments for past due invoices, you can send them an overdue invoice reminder. However, some firms would like to create a new invoice with a new invoice number and the past due balance for matters with no recent activity. To do so:
- From the left navigation panel, click Billing.
- From the menu options below Billing, click Invoice.
- From the toolbar atop the Invoices screen, click Add Bulk Invoice.
The Add Invoice screen opens, displaying matters with unbilled time and expense entries. - On the far right of the Select Matters To Bill section, click the filter icon.
The Filter panel displays. - In the Matter Billing Method section, select Hourly, Fixed Fee, Contingency, or all three, as applicable.
The Select Matters To Bill listing refreshes. - In the upper right corner of the Filter panel, click X to close the panel.
- Beside Only show Matters with unpaid balances, slide the toggle ON.
- From the list of entries that displays, select those for which you want to send invoices.
- In the upper right corner of the Add Invoice screen, click Generate. If you wish to generate your invoice(s) in draft, read the article on Pre-Bill Approval Process.