How Can We Help?
Search for answers or browse our knowledge base.
Auto-Create Timecard for Events, Tasks, and Notes
You can auto-create a timecard while adding your events, tasks, and notes, ensuring that you record time for those billable activities.
Auto-Create Timecard for Calendar Events
To automatically create a timecard while adding an event:
- Add an event from Quick Action, Matter Details or Calendar.

- From the billing status drop-down, select Billable.
- Check the box to Create automated timecard for this event.
- To record time for the task, from the drop-down, select the Event Owner.
This will create a timecard based on the event duration and the event owner’s rate level once you click Save. - The list of timecards will display the timecard for the event with an icon.

Auto-Create Timecard for Tasks
To automatically create a timecard while adding a task:
- Add a task from Quick Action, Practice, Matter Details or Calendar.

- From the billing status drop-down, select Billable.
- Check the box to Create timecard for this task.
When checked, new fields for primary assignee and time billed will display below. - From the drop-down, select the Primary Assignee.
- In the time billed field, enter the time spent on the task.
This will create a timecard based on the primary assignee’s rate level once you save the task. - The list of timecards will display the timecard for the task with an icon.

Auto-Create Timecard for Notes
To automatically create a timecard while adding a note:
- Add a note from Quick Action, Matters, Practice, or Calendar.
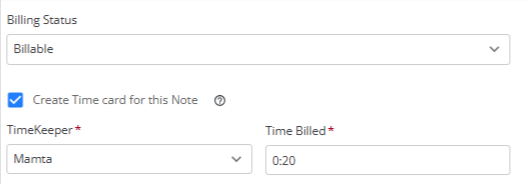
- From the billing status drop-down, select Billable.
- Check the box to Create timecard for this note.
When checked, new fields for timekeeper and time billed will display below. - From the timekeeper drop-down, select the Timekeeper.
- In the time billed field, enter the time spent on the note.
This will create a timecard based on the timekeeper’s rate level once you save the note. - The list of timecards will display the timecard for the note with an icon.
