How Can We Help?
Search for answers or browse our knowledge base.
Import Time and Expense
To save time and effort, you can import your Work in Progress(WIP) directly into your system.
Pre-Migration Checklist
Prior to starting any financial migration, do the following:
- Review/Add your Timekeepers (Setup > Timekeepers)
- Review/Add your Matter Owner’s (Setup > Matter Owners)
- Review/Add your Bank Accounts (Accounting > Banks)
- Complete global accounting selections (Setup > Firm Settings > Accounting Settings)
- Select appropriate client cost account by billing type
- Your non-financial data (Client & Matter information) must be successfully migrated
- Update Chart of Accounts with Firm specific ones, if any (Accounting > Chart of Accounts)
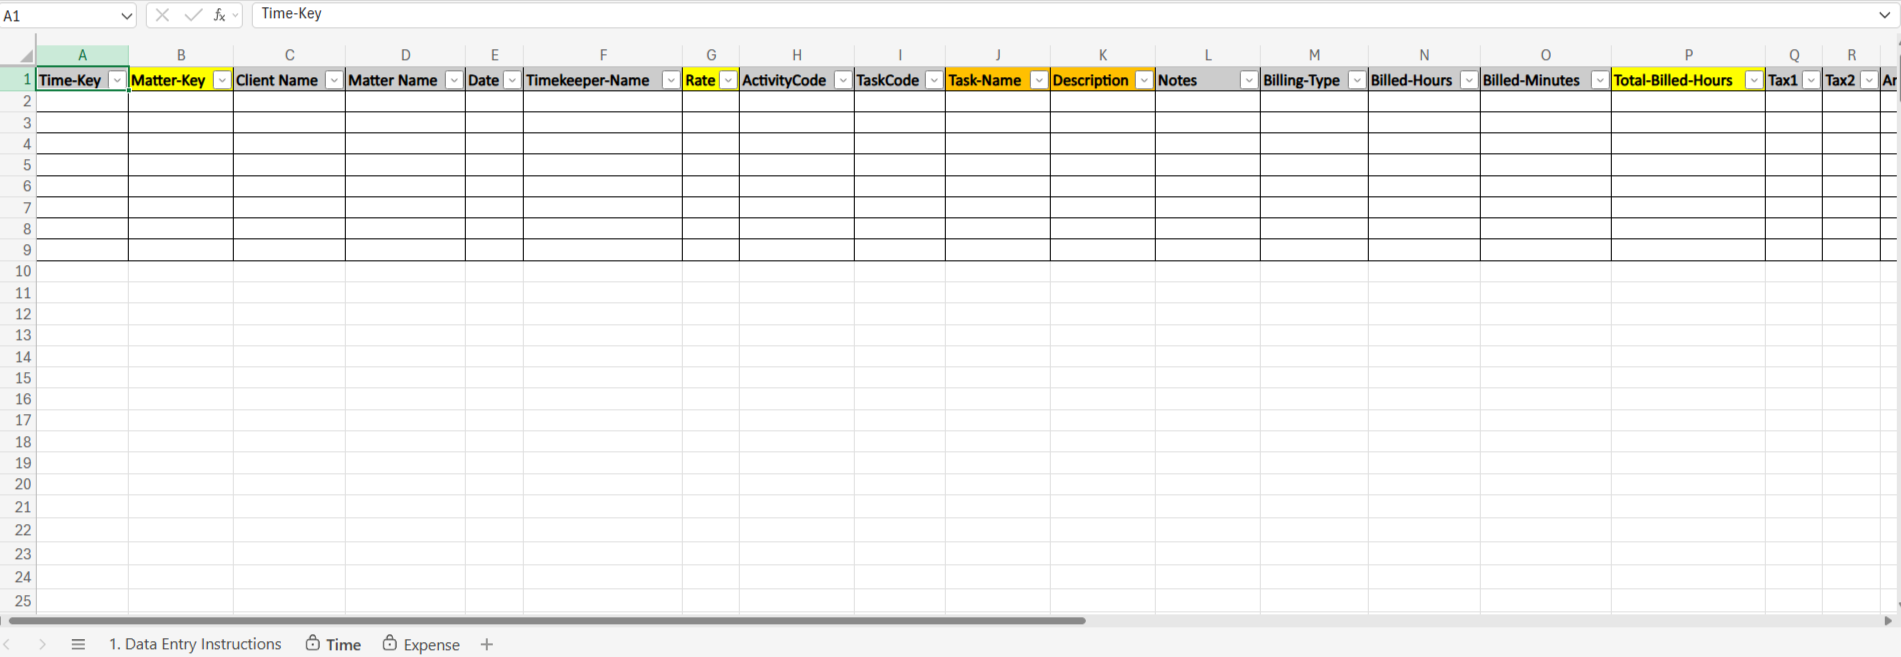
Complete the Data Import Spreadsheet
To import your time and expense:
- Download the Financial Data Import Spreadsheet to your preferred location. For a smooth import process, do not change the file name or format.
- Open the spreadsheet. Ensure the corresponding Client-Matter records already exist in the application prior to importing.
- At the bottom of the spreadsheet, click Data Entry Instructions.
- On the Data Entry Instructions tab, read the instructions.
- Click the Time or Expense tab, as applicable.
- Complete all applicable fields. (For field character limits and field descriptions, see the Data Entry Instructions sheet)
Some helpful tips:- For Matter-Key you can use either the system-assigned Matter ID# or the Matter File #. Whichever you use must apply to all imported items to ensure the import will match data already in the system.
- If the date field is left blank, the date of import will pre-populate
- For Billing-Type column, choose one of these values: Billable, Non-billable, or No Charge.
- If using the Billed-Hours and Billed-Minutes fields, enter in full numbers such as 1 hr 30 min equals Billed-Hours = 1 in Hours and Billed-Minutes = 30,
- If using Total-Billed-Hours instead, enter as decimals, such as 1.50.
Important: If your time entries are taxable, make sure to complete the applicable tax fields
Import Your WIP
- In the upper right corner of your screen, click Quick Action.
- At the bottom of the drop-down, click Import Data.

The Custom Import screen opens.
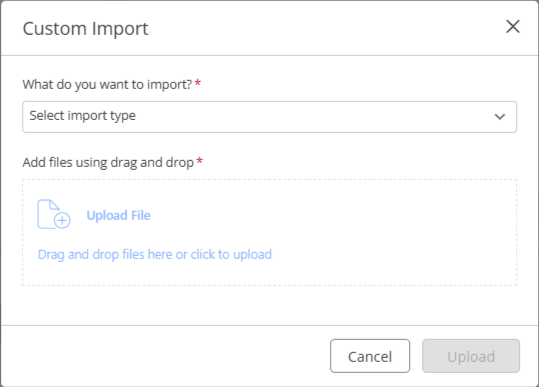
- From the What do you want to import field drop-down, select Import Time/Expense.
- In the Add files using drag and drop field, click Upload File or Drag and drop the file from your browser.
On the browser window, locate the spreadsheet and double-click it.
The file name populates the Choose File field. - In the bottom right corner, click Upload.
- Confirm the File has headers checkbox is checked.
The screen refreshes, displaying your contact data. - If there are issues with the data, the Total Errors, Total Warnings and Total Auto-Fix fields display tallies.
| Total Errors | Items that need to be addressed and fixed prior to export |
|---|---|
| Total Warnings | Issues that the import identified and can correct for you |
| Total Auto-Fixes | Items the system already fixed |
- Click the colored triangle to the left of any field for information regarding how to address the warning, then apply the fix. If you are unable to fix an error at this time, uncheck the box beside the client’s name to remove them from the import.
- In the upper right corner of the screen, click Complete Import.
A message box displays: Are you sure you want to complete the import? - Click Yes.
A message displays: Import data has been completed successfully. - Click Close.
Common Error Resolutions
Use these resolutions to assist with common errors:
| Referenced client matter does not exist |
|
|---|---|
| Timekeeper name does not match |
|
| Invalid values for time |
|
For further clarity, read our Financial Data Migration Guide