Search for answers or browse our knowledge base.
Change or Write-Off an Invoice Balance
You have the ability to adjust the invoice total or write off the balance once the invoice has been sent to your client or after partial payment has been made. Utilizing the Change/Write-off Invoice function preserves the original invoice entry while generating a new record that reflects the adjustments you’ve made.
Users granted permission to edit invoices are authorized to initiate changes or write-offs for an invoice.
Watch a Video
Change or Write-Off an Invoice Balance
From Matters
- From the left navigation panel, click Matters.
- From the Matters screen, double-click the matter, or single-click the matter to highlight it, then scroll down to view the matter details.
- From the Matters navigation menu, click Billing.
- From the tabs atop the Billing Screen, click Invoice.
- Single-click your invoice to highlight it and click on the three dots to the right of the invoice.
- Select Change/Write-off Invoice.

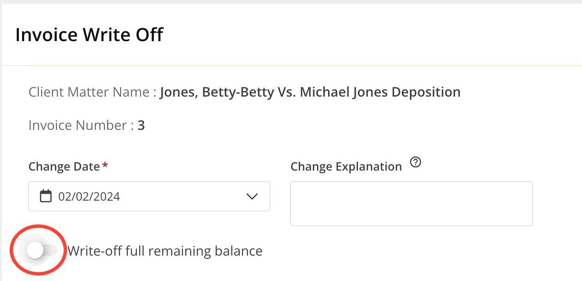
The Invoice Write-Off screen opens, with the Matter field referencing the applicable matter. - From the Change Date drop-down, select the date of this change.
- If applicable, in the Change Explanation field, enter the change description you want to display on the client’s invoice.

- Take the appropriate action:
- OPTION A: Write off the full remaining balance
- Toggle beside Write-off full remaining balance.
- Click Save. The screen updates to display a 0.00 Invoice Balance and a Paid status.
- OPTION B: Write off partial or specific line items.
-
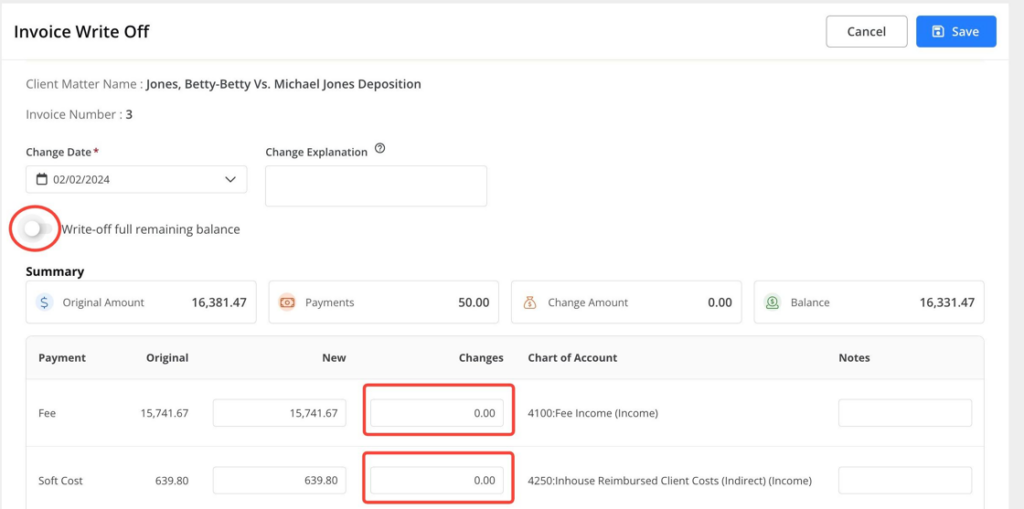
- Please indicate the partial or full amount for each fee or expense line item, and include any relevant internal notes. Note that these internal remarks will only appear on Change/Write-off reports for internal reference.

- Please indicate the partial or full amount for each fee or expense line item, and include any relevant internal notes. Note that these internal remarks will only appear on Change/Write-off reports for internal reference.
-
- OPTION A: Write off the full remaining balance
- Click Save. The Invoice Balance field displays the new total.
From Billing
- From the left navigation panel, click Billing and select Invoice.
- Here you’ll find a list of all invoices. If needed, utilize the filter icon to refine your search and locate the specific invoice you are looking for. While browsing through the list of invoices, you can select your invoice with a single click to highlight it.
- Click on the three dots located to the right of the invoice entry and select Change/Write-off Invoice.

The Invoice Write-Off screen opens, with the Matter field referencing the applicable matter. - From the Change Date drop-down, select the date of this change.
- If applicable, in the Change Explanation field, enter the change description you want to display on the client’s invoice.

- Take the appropriate action:
- OPTION A: Write off the full remaining balance
- Toggle beside Write-off full remaining balance.
- Click Save. The screen updates to display a 0.00 Invoice Balance and a Paid status.
- OPTION B: Write off partial or specific line items.
-
- Please indicate the partial or full amount for each fee or expense line item, and include any relevant internal notes. Note that these internal remarks will only appear on Change/Write-off reports for internal reference.

- Please indicate the partial or full amount for each fee or expense line item, and include any relevant internal notes. Note that these internal remarks will only appear on Change/Write-off reports for internal reference.
-
- OPTION A: Write off the full remaining balance
- Click Save. The Invoice Balance field displays the new total.
Important: The Balance field will not equal the New field’s Total if previous payments were applied to the invoice. To address this situation, see the example below.
-
- Change
- In either the New or Change field for the applicable line items, enter your changes. For New, enter your updated total. For Change, enter the difference you want to apply as a negative amount.
The change column calculates and displays the line item adjustment amount and updates the invoice balance. - In the Notes field, you can enter internal notes that will display only on Change/Write-off reports.
- Click Save.
The Invoice screen updates the Invoice Balance field to the new total. - To view your changes, single-click the invoice and click on the three dots at the end of the row and from the drop-down, click View Details.
- In either the New or Change field for the applicable line items, enter your changes. For New, enter your updated total. For Change, enter the difference you want to apply as a negative amount.
- Change
Note: You can also write-off the remaining balance while paying an invoice.
Change/Write-off Reporting
The Invoice Change/Write-offs Journal comprehensively logs all Change/Write-Off activities.
Additionally, the Change/Write-Off function has a cascading effect on the following reports:

