How Can We Help?
Search for answers or browse our knowledge base.
Manage Your Custom Labels
You can manage your tags or custom labels to further organize items such as:
- Matters
- Events
- Tasks
- Emails
- Notes
- Documents
From Setup
To add a label:
- From the toolbar, click your Profile icon.
- From the drop-down, select Setup.
- From the Setup left navigation, click List Items.
- From the tabs atop the List Items screen, click Labels.
- From the toolbar atop the Labels screen, click Add.
- On the Add Label screen, in the Label field, enter your label.
- From the Category field’s drop-down, click the category to which the label applies. As a default, your label applies to all items.
- In the lower right corner, click Save.
The system saves your label and adds it to the list for tagging to an item.
From Matters
New Matter
To add a label to a new matter:
- From the left navigation panel, click Matters.
- From the toolbar atop the Matters screen, click Add Matter.
- On the Add Matter screen, click the Custom Labels field.
- In the Label field, enter your label.
- In the upper right corner, click Save.
The system saves your label and tags it to the matter.
Existing Matter
To add a label to an existing matter:
- From the left navigation panel, click Matters.
- On the Matters screen, either double click the matter or single click to highlight it, then click the three dots at the end of the row and from the drop-down, click View.
- Scroll down to the matter’s details and from the tabs, click Settings.
- From the tabs atop the Settings screen, Click Matter Info.
- On the Matter Info section, click the Custom Labels field.
- In the Label field, enter your label.
- In the upper right corner, click Save.
The system saves your label and tags it to the matter.
From Emails
To add a label from Emails:
- From the left navigation panel, click either Matters or Practice.
- To access emails from:
- Matters:
Double click on a Matter and from the tabs atop the Summary section, click Communications. - Practice:
From the Practice menu, click Communications.
- Matters:
- From the tabs atop the Communication screen, click Emails.
- On the Emails screen, select the email to which you want to add the label and click on the three dots at the end of the row.
- From the drop-down, click Associate Labels.
- On the Associate Labels screen, in the Labels field, click the drop-down.
- From the drop-down, click Create New Label.
- On the Create New Label screen, in the Label field, enter your label.
The Category field defaults to Email. - In the lower right corner, click Create Label.
The Associate Labels screen displays the tagged new label. - Either repeat steps 3 – 6 as needed, or in the lower right corner, click Save.
The system saves your label or labels as applicable and tags it to the emails.
Learn how to Use Labels to Organize Your Emails
From Tasks
New Task
To add a label to a new task:
- From the left navigation panel, click either Matters or Practice.
- To access task from:
- Matters:
Double click on a Matter and from the tabs atop the Summary section, click Matter Management.
From the tabs on the Matter Management screen, click Tasks. - Practice:
From the Practice menu, click Tasks.
- Matters:
- From the toolbar atop the Tasks screen, click Add Task.
- On the Add Task screen, in the Custom Labels field, click Add New Label.
The Create New Label screen opens. The Category field defaults to Matter. - In the Label field, enter your label.
- In the lower right corner, click Save.
The system saves your label and tags it to the task. - Repeat steps 4 – 6 to add labels, if needed.
- Complete the remaining task fields.
- In the lower right corner, click Save.
The system saves your task and your tagged label.
Existing Task
To add a label to an existing task:
- Follow the steps 1 & 2 above to access tasks from either Matters or Practice.
- From the applicable Matters or Practice Management section, click Tasks.
- On the Tasks screen, either double-click a task, or single-click it to highlight it, and then from the toolbar, click Edit.
- On the Edit Task screen, in the Custom Labels field, click Add New Label.
The Create New Label screen opens. The Category field defaults to Matter. - In the Label field, enter your label.
- In the lower right corner, click Save.
The system saves your label and tags it to the task. - Repeat steps 4 – 6 as needed.
- In the lower right corner, click Save.
The system saves your task with the tagged label.
From Notes
New Note
To add a label to a new note:
- From the left navigation panel, click either Matters or Practice.
- To access notes from:
- Matters:
Double click on a Matter and from the tabs atop the Summary section, click Matter Management.
From the tabs on the Matter Management screen, click Notes. - Practice:
From the Practice menu, click Notes.
- Matters:
- From the toolbar atop the Notes screen, click Add Note.
- On the Add Note screen, in the Custom Labels field, click Add New Label.
The Create New Label screen opens. The Category field defaults to Matter. - In the Label field, enter your label.
- In the lower right corner, click Save.
The system saves your label and tags it to the note. - Repeat steps 4 – 6 to add labels, if needed.
- Complete the remaining note fields.
- In the lower right corner, click Save.
The system saves your note and your tagged label.
Existing Note
To add a label to an existing note:
- Follow the steps 1 & 2 above to access notes from either Matters or Practice.
- From the applicable Matters or Practice left navigation, click Notes.
- On the Notes screen, either double-click a task, or single-click it to highlight it, and then from the toolbar, click Edit.
- On the Edit Note screen, in the Custom Labels field, click Add New Label.
The Create New Label screen opens. The Category field defaults to Matter. - In the Label field, enter your label.
- In the lower right corner, click Save.
The system saves your label and tags it to the note. - Repeat steps 4 – 6 to add labels, if needed.
- In the lower right corner, click Save.
The system saves your note with the tagged label.
From Document Properties
To add a new label from document properties:
- From the left navigation panel, click either Matters or Documents.
- To access documents from:
- Matters:
Double click on a Matter and from the tabs atop the Summary section, click Documents.
- Matters:
- On the Documents screen, from your file storage folder structure, click either Internal Documents or Client Portal Documents as applicable.
Your documents display in the window.
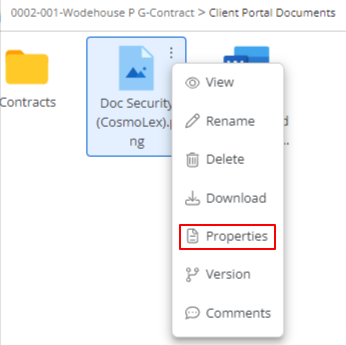
- Single-click a document to highlight it, click on the three dots in the upper right corner and from the drop-down, click Properties.
- On the Document Properties screen, in the Custom Labels field, click Add New Label.
The Create New Label screen opens. The Category field defaults to Document. - In the Label field, enter your label.
- In the lower right corner, click Save.
The system saves your label and tags it to the document. - Repeat steps 5 – 7 as needed.
- In the lower right corner, click Save.
The system saves your document with the tagged label.
Edit a Label
To add a label:
- From the toolbar, click your Profile icon.
- From the drop-down, select Setup.
- From the Setup left navigation, click List Items.
- From the tabs atop the List Items screen, click Labels.
- On the Labels screen, either double-click the label, or single-click it to highlight it, and then from the toolbar, click Edit.
- On the Edit Label screen, either change the name or uncheck the Active checkbox, as needed.
- Click Save.
The system saves your label changes and updates items to which your firm tagged the label.
Important: If you chose to Apply to all items when creating the label, then your change will be universal with an exception: if you created multiple labels across various categories, you must update each label.
Deactivate or Delete a Label
To deactivate or delete a label:
- From the toolbar, click your Profile icon.
- From the drop-down, select Setup.
- From the Setup left navigation, click List Items.
- From the tabs atop the List Items screen, click Labels.
- On the Labels screen, edit the label prior to deactivating it, if desired.
- Single-click the label to highlight it, and then from the toolbar, click Delete.
The Delete Label message box reads: Deleting a label would remove it from ALL the items it has been previously applied. Instead, consider making it inactive as it will prevent its future use but will not remove from prior items.
Note: We recommend you deactivate a label if your firm has associated it with any items. - In the lower right corner. click Mark as inactive or Delete as desired.
The system deactivates or deletes the label, as applicable.
Search by Labels
Note: To search for items based on a custom label:
- Go to the appropriate screen and click on Search (funnel icon).
- In the filter’s label field, enter the label name by which you wish to search.
All the items with the selected label will be displayed on the screen.