Setting Up Document Templates to Fill With Client Information from the Database Using Mail Merge Codes (Document Automation 101)
Use mail merge codes to build reusable Word, PDF, and Excel templates that auto-fill client data from the CRM database.
Tutorial for Setting Up Word, PDF, and Excel Documents to Fill with Client Information from the Database (Document Automation 101)
What are Mail Merge Codes?
Mail merge is a time-saving feature to create repetitive documents from letters to contracts to emails to labels and more by reusing a document template that you design. Setting up document templates to be reused is also known as Document Automation
The mail merge feature in Rocket Matter CRM is compatible with Microsoft Word, Excel, and Adobe PDF documents. Each field/datapoint in Rocket Matter CRM has its own mail merge code that could be used in document templates, automation, and e-signs.
Before you get started working with a document to design a document template, the first thing that you will need to do is find the mail merge code for each field in Rocket Matter CRM that you would like to use in your document. Of note, all mail merge codes in Rocket Matter CRM are surrounded by angular brackets, e.g. <<Lead Full Name>>, <<Lead First Name>>, etc
For example, if you had a lead or case with the name of"John Smith" and you added <<LeadName>> to a document template, then use the template in Rocket Matter CRM, then it would insert the"John Smith" into the output document for you. Imagine mail merge codes as placeholders that fill information from the database, but print as a blank space if the information does not exist in the database for a particular field.
Also, you may use modifiers with any date fields in Rocket Matter CRM. An example of a modifier is FullDate or FullDateOrdinal. Modifiers are separated from the mail merge code name with a"|" pipe symbol. An example of a modifier is if you wanted to output the full date as it would read in a letter. <<Trial Date|FullDate>> outputs with the full date written out: May 24, 2021, instead of 5/24/2021.
⚠ Note: Do not remove the brackets around mail merge codes or they will not work properly
Where Do I Find/How Do I Use Mail Merge Codes?
To find mail merge codes to use in your document templates:
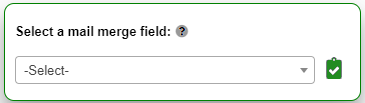
⭐ Recommended: Click Documents on the left menu > then click on the Document Templates tab and there will be a floating dropdown picker that allows you to keyword search mail merge codes and copy/paste them into any document template that you are editing.
This is the simplest method of setting up document templates and is highly recommended.
Click on the dropdown field to keyword search > click the green checkmark to copy to clipboard > then, you will paste the mail merge code into your document template in the appropriate place for each field. Rinse and repeat with the next field, etc. <<Do not remove the brackets>>
Note: Contact and event mail merge fields are within the context of each lead/case so they are not displayed in our field search tool. Please review the article below for the codes for those features.
Expert Tip: When pasting a mail merge code, right-click with your mouse and"Paste As Plain Text" to retain the same formatting as the document that you are pasting into.
⚠ Note: Mail merge codes could be used in a single practice area or generically for all practice areas.
Ensure that the case type of the intake/case form matches that of the leads/cases that you want to use the document template on when using mail merge codes. Do not use mail merge codes that belong to another practice area that does not match the case type of a particular lead/case then or they will print as empty/blank information.
For example, for leads/cases with the Social Security Disability practice area, make sure you use mail merge codes from the Social Security Disability intake/case form. You set the same case type inside each lead/case you want to use this form on. Otherwise, it will print blanks. It is recommended that you create document templates specific to a single practice area unless it is a generic form with a limited number of mail merge fields.
How to Use Contacts as Mail Merge Fields in Document Templates
Want to use the primary contact or additional parties from a lead/case in a mail merge? There are a variety of different contacts that could exist on any given lead/case. Other than the primary contact (the client) of each case, there may be additional parties such as experts, spouses, judges, adjusters, medical providers, etc. Using contacts in mail merge is a breeze but you must use the Contact mail merge codes which require the Case Role of each Contact to be included.
The Primary Contact is the main contact in a lead or case and functions the same as additional parties for mail merge purposes. It is all about using the Contact mail merge code with the Case Role

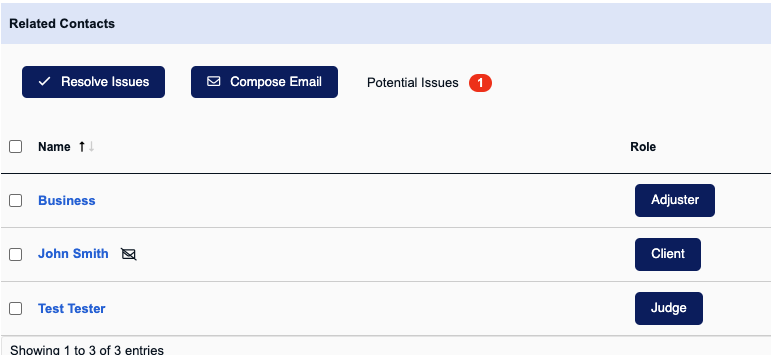
Related Contacts have their own section inside of the record, as shown below. In the example below, there are two additional parties, a Judge, and an Adjuster. Let's review how to use both in a mail merge.
All mail merge codes are case sensitive and are surrounded by two angular brackets, such as <<Contact.Role.Name>>. Note: this is not an actual mail merge code. It is provided for example purposes to show the structure. If there are spaces between words, keep them as they are naturally.
This is a complete list of the mail merge codes that you may use with any contacts that you add to each lead/case inside of the system:
- Prefix - example: <<Contact.Role.Prefix>>
- Name - example: <<Contact.Role.Name>>
- First Name - example: <<Contact.Role.First Name>>
- Middle Name - example: <<Contact.Role.Middle Name>>
- Last Name - example: <<Contact.Role.Last Name>>
- Suffix - example: <<Contact.Role.Suffix>>
- Gender - example: <<Contact.Role.Gender>>
- Marital Status - example: <<Contact.Role.Marital Status>>
- Company Name - example: <<Contact.Role.Company Name>>
- Job Title - example: <<Contact.Role.Job Title>>
- SSN - example: <<Contact.Role.SSN>>
- Work Phone - example: <<Contact.Role.Work Phone>>
- Home Phone - example: <<Contact.Role.Home Phone>>
- Primary Phone - example: <<Contact.Role.Primary Phone>>
- Fax - example: <<Contact.Role.Fax>>
- Email - example: <<Contact.Role.Email>>
- Secondary Email - example: <<Contact.Role.Secondary Email>>
- When to Contact - example: <<Contact.Role.When to Contact>>
- Contact Preference - example: <<Contact.Role.Preference>>
- Full Address - example: <<Contact.Role.Full Address>>
- Street Address - example: <<Contact.Role.Street Address>>
- City - example: <<Contact.Role.City>>
- State - example: <<Contact.Role.State>>
- Zip - example: <<Contact.Role.Zip>>
- Language - example: <<Contact.Role.Language>>
- Drivers License # - example: <<Contact.Role.Drivers License #>>
- Date of Bankruptcy - example: <<Contact.Role.Date of Bankruptcy>>
- Date of Birth - example: <<Contact.Role.Date of Birth>>
- Date of Death - example: <<Contact.Role.Date of Death>>
- Contact Type - example: <<Contact.Role.Type>>
- Contact Notes - example: <<Contact.Role.Notes>> Note: Only use Contact Notes for internal purposes since they may contain confidential information. We do not recommend this being used in letters.
The Case Role of each additional contact/party in each case is used in each contact mail merge code, so it is important to set up your document templates in a consistent way.
You will replace 'Role' inside of the mail merge code with the name of the Case Role that you would like to insert. If any specific lead/case has multiple parties with the same Case Role then the system will ask you which one you would like to use, but be careful this will not complete the job in automated document creation until you decide.
For example, the mail merge code for the full name of the Judge below would be:
<<Contact.Judge.Name>>
If you used this in a document template, this would output:
Brooke Test
Another example would be to add a mail merge code for the complete mailing address for the same Judge example below, which would be:
<<Contact.Judge.Full Address>>
If you used this in a document template, this would output:
7522 Wiles Rd Ste 210, Coral Springs, FL 33067
Example usage inside of a real document template:
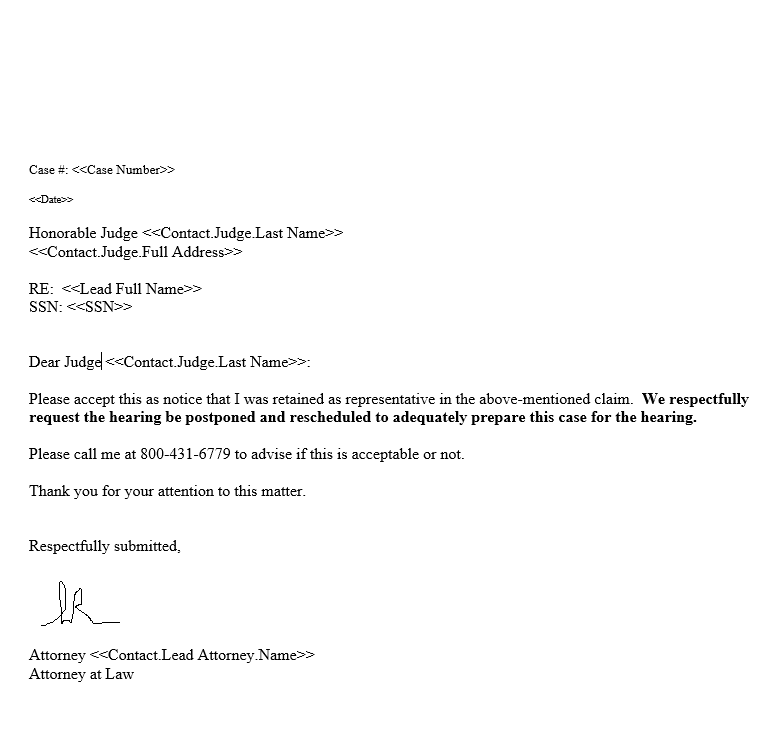
⚠ Note: If you run into an occasion where you have the same Case Role used for multiple parties on a particularlead/case, you will need to choose which party to fill in your document each time you use the document template. For example, you may have two adjusters. When your document templates run across this scenario, the system will ask you to make a choice.
However, If you use a document template in automation, then there is no human intervention involved in that process, so the system will log the conflict but will not fill the data for you since manual intervention is required. It is recommended not to do so for that reason and to keep your automated templates straightforward.
Using Event/Appointment Mail Merge Fields in Document Templates
Hearing dates, consultations, mediations, litigation, and other appointment-type events require their own mail merge fields. Appointment mail merge fields are based on the Event Type of each appointment/event.
The default appointment/event mail merge code is Appointment, so you would want to add Event Type (if any), then the expected"Output," e.g., Date, Time, Date & Time, and finally add any modifiers at the end.
Event-type mail merge fields will always follow this format:
<<Event.EventType (or No Type).Output|Modifier (if any)>>
Example:
For 05/02/2021, <<Event.Hearing Date.Date|fulldateordinal>> would output as:
2nd day of May 2021 (this is popular for official documents)
(The 'nd' would not be added after the day if an Ordinal modifier was not used)
- Event Date - No Event Type <<Event.No Type.Date>>
- Event Date <<Event.Event Type.Date>>
- Event Time <<Event.Event Type.Time>>
- Event Date and Time <<Event.Event Type.DateTime>>
For example, the mail merge code for an event without an Event Type could be:
<<Event.No Type.DateTime>>
For example, the mail merge code for a"Hearing Date" Event Type could be used in these ways:
- Hearing Date, as a Date
- example: <<Event.Hearing Date.Date>> would output as:
05/02/2021
(only the date, not the time, was requested, if it was scheduled for May 2, 2021)
- example: <<Event.Hearing Date.Date>> would output as:
- Hearing Date, as a Time
- example: <<Event.Hearing Date.Time>> would output as:
11:00 AM
(only the time was requested if it was scheduled for 11 AM)
- example: <<Event.Hearing Date.Time>> would output as:
- Hearing Date, as a Date & Time
- example: <<Event.Hearing Date.DateTime>> would output as:
05/02/2021 11:00 AM
(the system defaults to slashes as separators, unless modifiers are used)
- example: <<Event.Hearing Date.DateTime>> would output as:
- Hearing Date as a Date (Ordinal Dates append 'nd' 'th' 'st' 'rd' to the day)
- example:
For 05/02/2021, <<Event.Hearing Date.Date |FullDateOrdinal>> would output as:
2nd day of May 2021 (this is popular for official documents)
(The 'nd' would not be added after the day if an Ordinal modifier was not used)
- example:
As shown in the last example above, there are modifiers available for expressing Appointment/Event Dates differently. You must place modifiers immediately after the field name at the end of the mail merge codes.
Use a pipe symbol | (without spaces) to use the modifiers:
<<Customexample123|DayOrdinal>>
<<Customexample123|Month>>
<<Customexample123|Year>>
<<Customexample123|MonthYear>>
<<Customexample123|FullDateOrdinal>>
<<Customexample123|FullDateOrdinal2>> (with 2) for ordinal date with comma: 9th day of May, 2021
with a pipe"|" similar to <<Custom123|SlashDate>>, fulldate, areacode, phone etc.
⚠ Note: If you run into an occasion where you have multiple events/appointments in the same lead/case that all have the same Event Type you will need to make a choice as to which appointment to fill in your document each time that you use the document template. For example, you may have two hearing dates. When your document templates run across this scenario, the system will ask you to make a choice.
However, If you use a document template in automation, then there is no human intervention involved in that process so the system will log the conflict but will not fill the data for you since manual intervention is required. It is recommended not to do so for that reason and to keep your automated templates straightforward.
Using Modifiers for Mail Merge Fields in Document Templates
Date Fields
You can use modifiers with any date fields in Rocket Matter CRM. An example of a modifier is FullDate or FullDateOrdinal. Modifiers are separated from the mail merge code name with a"|" pipe symbol.
Date field mail merge codes may be added to document templates in three ways as shown below:
<<Custom123>> outputs with slashes as separators (this is the default): 05/24/2021
<<Custom123 |FullDate>> outputs with the full date written out: May 24, 2021
<<Custom123 |DashDate>> outputs with dashes as separators: 05-24-2021
Address Fields
Modifiers can also be used with address fields. By default, the mail merge codes for addresses will insert the complete address in one line. However, the mail merge codes can be modified so that the address is merged into the document in a block format instead.
Example:
The mail merge code <<Full Address>> without any modifiers would output as:
1234 N State Road 5, Fort Lauderdale, FL 33321
By adding the Block modifier, the mail merge code would change to <<Full Address |Block>> and would output as:
1234 N State Road 5
Fort Lauderdale, FL 33321
The Block modifier is supported with the following address mail merge codes:
<<Full Address>>
<<Referral Firm Address>>
<<Contact.Role.Full Address>>
<<Office Location Address>>
State Fields
The mail merge code for state fields can also be modified, allowing you to choose whether you'd like to merge the full state name or only the abbreviation.
Example:
The mail merge code <<State>> without any modifiers would output as: FL
By adding the Full State Name modifier, the mail merge code would change to <<State |FullStateName>> and would output as: Florida
The Full State Name modifier is supported with the following state mail merge codes:
<<State>>
<<Firm State>>
<<Contact.Role.State>>
<<State of Filing>>
Using Special Fields in PDF Document Templates
Please note that certain PDF documents include unique field properties that require custom setup for mail merge codes. In those instances, you cannot use the most common approach where you put each mail merge code as the Default Value of a field. For example, custom checkboxes that contain values other than Yes or No will require you to set PDF Field Names, not Values (the output). This is unique to working with PDF documents.
Yes/No Fields
One Yes/No block shares the same Field Name so you should plan on using the same mail merge code for both values inside of the PDF document. Only Yes/No questions behave this way in PDF documents.
- For Yes/No questions in a PDF document, you can use either radio buttons or checkboxes.
- You must add the same Rocket Matter CRM mail merge code inside of three places:
- The"Yes" field
- The"No" field
- Also, add to"Name" under the General tab in the field properties in the PDF document
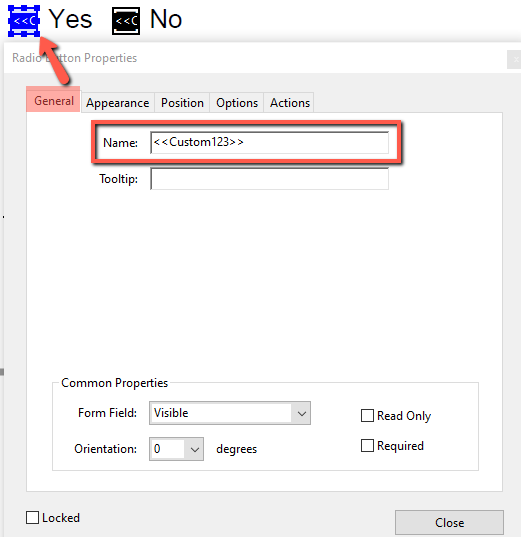
- Click on the"Options" tab in the PDF document and then set the value for each.
- For"Yes" set the"Radio Button Choice" to"Yes"
- For"No" set the"Radio Button Choice" to"No"
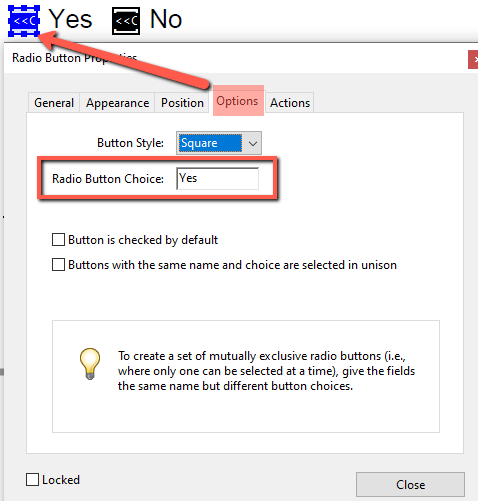
- The Export Value is
- for Yes checkbox:
- Name: <<Custom123>>
- Radio Button Choice or Export Value: Yes
- for No checkbox (optional):
- Name: <<Custom123>>
- Radio Button Choice or Export Value: No
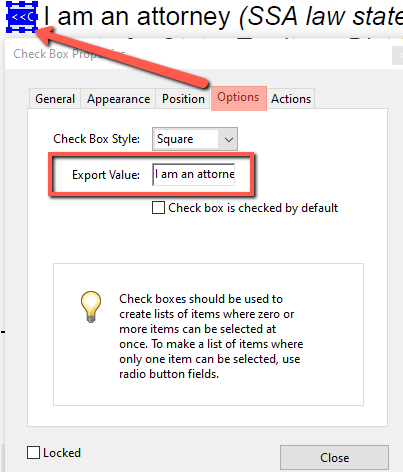
- for Yes checkbox:
Pick List Fields
Use checkboxes in pdf. Use actual option values.
Name: <<Custom124|=First Option Value>>
Export Value: any
Name: <<Custom124|=Second Option Value>>
Export Value: any
Name: <<Custom124|=Third Option Value>>
Export Value: any
Radio Buttons
(or a group of checkboxes with one choice allowed). They share the same Field Name.
Use the actual option values.
Name: <<Custom125>>
Radio Button Choice or Export Value: First Option Value
Name: <<Custom125>>
Radio Button Choice or Export Value: Second Option Value
Name: <<Custom125>>
Radio Button Choice or Export Value: Third Option Value
Drop-Down Fields
Name: <<Custom126>>Radio Button Choice or Export Value: First Option ValueName: <<Custom126>>Radio Button Choice or Export Value: Second Option ValueName: <<Custom126>>Radio Button Choice or Export Value: Third Option Value
Mail Merge of Fragments - Parts of SSN/Phone Number Blocks/Middle Initials
To get substring add after custom field name |[0 start_index_from_1,number_of_characters] leading zero means that before taking a fragment of the field, it removes any non-digit characters.
Start index counts from 1.
In the PDF document, set for the field: Options->Comb of # characters (where # is 3, 2, 4 for each part respectively)
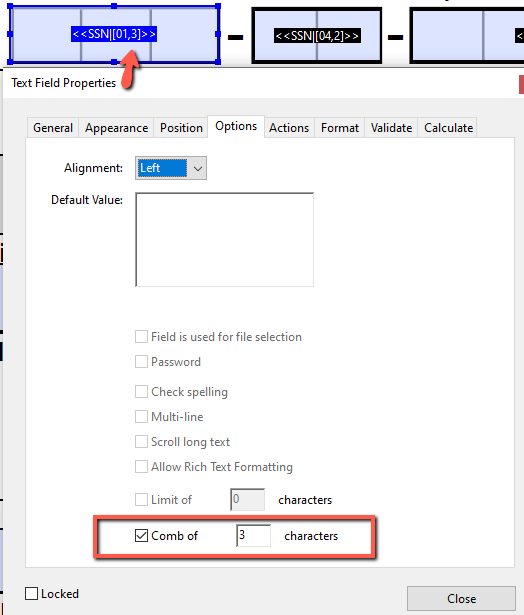
Name: <<Custom127|[01,3]>>
Sample input: 123-45-6789
Result: 123
Name: <<Custom127|[04,2]>>
Result: 45
Name: <<Custom127|[06,4]>>
Result: 6789
If you need to reference the last 4 digits of a social security number, you can use this modifier as well:
<<SSN|last4>>
Parts of a phone number
Name: <<Custom128|areacode>>
Sample input: (123) 456-7890 or +11234567890
Result: 123
Name: <<Custom128|phone>>
Result: 456-7890
The first letter of Middle Name (Initial)
Name: <<Lead Middle Name|[1,1]>>
Sample input: Michael
Result: M